YOU WILL NEED: -
- Dust
sheets or similar material to protect carpets furniture etc.
- Disposable
plastic gloves (optional).
- A
bucket or bowl of clean water plus rags for cleaning.
- A
tin of paint thinned with transparent glaze according to manufacturers
instructions.
- A
paintbrush.
- Some
lint-free cotton cloth or rags.
Like all paint-effects, wiping back can be a little messy, so wear old clothing or overalls.
Also: remove or cover all carpets, furniture and other valuables from the room.
Wiping-back can be performed on embossed wall coverings and ornate plasterwork.
Ensure that the surface is thoroughly dry before you begin. (At least 24 hrs for wallpaper & 7 days for new plaster).
Prepare
the surface that is to be painted, apply at least 2 coats of mid-sheen paint in your chosen
colour
and allow to dry thoroughly.
WIPING BACK PROCESS.
In this technique, part of the topcoat, or glaze, is removed by wiping a dry cloth over the surface.
Where the cloth makes contact with the surface, the glaze is lifted revealing the base coat beneath.
Apply the mixed glaze evenly with a brush or roller.
For large areas (embossed wall coverings etc.):
Water-based paint dries quickly so start on your smallest walls first; your speed will improve with experience.
Have a bucket or bowl of clean water and some rags close at hand for cleaning purposes.
It is advisable to get someone else to paint the wall with the mixed glaze ahead of you, so that you can concentrate on creating the effect
If you must work alone, paint small sections, 3ft (1 metre) at a time, & stop the wiping process 6 inches (150mm) short of the leading edge.
Ensure that the glaze covers the entire surface, getting into all of the crevices.
Take a piece of lint-free cotton cloth and fold it to make a pad with a smooth surface (not creased or crumpled).
Wipe the cotton pad lightly over the surface to remove some of the glaze.
If the cloth does not remove enough of the glaze, repeat the process, pressing on more firmly.
Re-fold or replace the cotton pad regularly, so that it does not become saturated with glaze.
It is important to apply the same amount of pressure over the entire surface to create an even pattern.
Allow the paint to dry before protecting with a coat of clear glaze or varnish (optional).
|
|
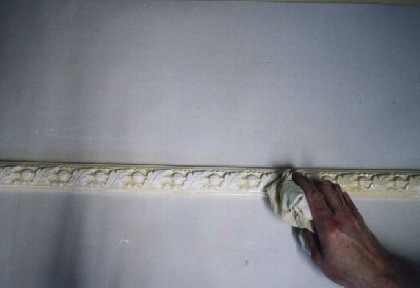
Embossed wallpaper.
|
|
|
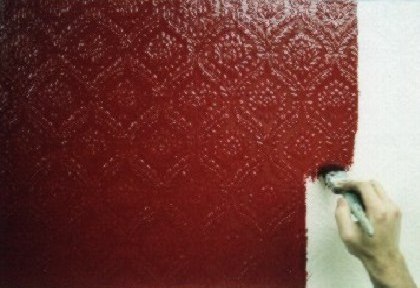
Apply basecoat & allow to dry.
|
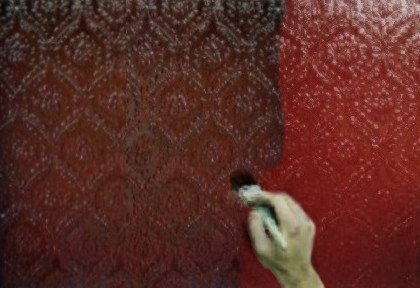
Apply semi-transparent glaze.
|
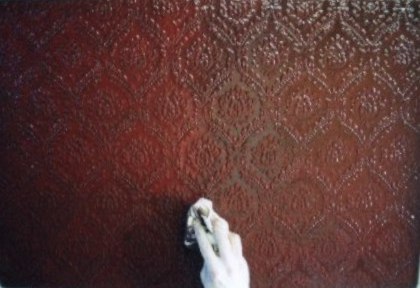
Wipe back with cotton cloth.
|
|
|
|
Plaster ceiling rose.
|
|
|
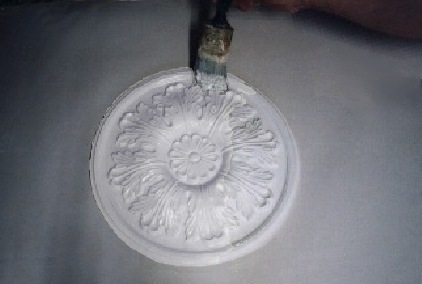
Apply basecoat & allow to dry.
|
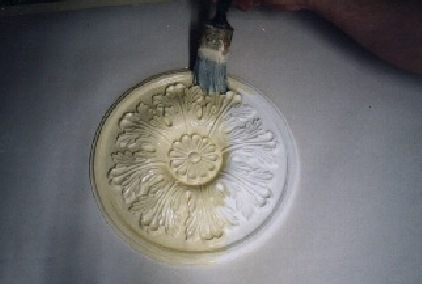
Apply semi-transparent glaze.
|
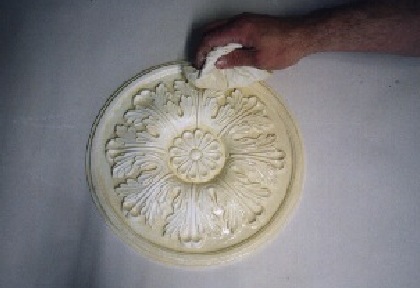
Wipe back with cotton cloth.
|
|
|
|
|
Use the same technique for plaster cornice, dado rails etc.
|
!!! With oil-based
method, used rags must be laid flat and allowed to dry before discarding to prevent spontaneous combustion. !!!
A semi sheen finish is best for the base-coat, as the bag will slide if the surface is too shiny & a matt finish allows the glaze to dry too quickly.
The more contrast between the basecoat and topcoat; the more pronounced the pattern will be. (Especially important with this effect)
You should not add white to the basecoat colour to make the topcoat, or vice versa. This gives poor results unless the contrast is strong.
An oil-based basecoat will greatly improve the working time of the glaze. It is advisable to use an oil-based topcoat too in this instance.
You needn't worry about getting paint on the ceiling or woodwork, this can be corrected later & avoiding these areas will spoil the effect.
Colours should be related in some way, either different tones of the same colour, or similar tones of related colours.
Dark or strong colours give a rich effect, but the base-coat must be fairly light compared to the glaze for the effect to be visible.
Variations in finish can be achieved using different types of material such as paper rather than cellophane.