- Dust sheets or similar material to protect carpets furniture etc.
- Disposable plastic gloves (optional).
- A bucket or bowl of clean water plus rags for cleaning.
- A tin of paint thinned with transparent glaze according to manufacturers instructions.
- A large brush for application.
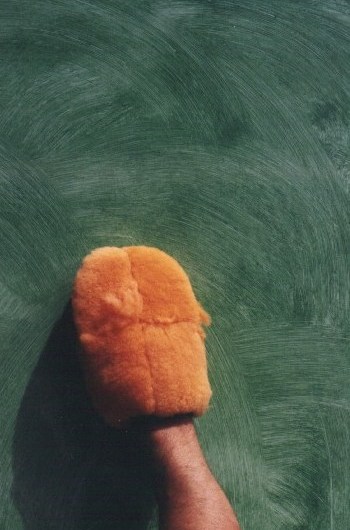
- A large flat brush or car-cleaning mitt.
Like all paint-effects, colourwashing can be a little messy, so wear old clothing or overalls.
Also: remove or cover all carpets, furniture and other valuables from the room.
Prepare
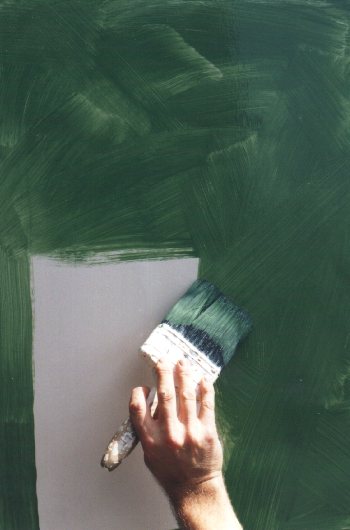
the surface that is to be painted, apply at least 2 coats of mid-sheen paint in your chosen
colour
and allow to dry thoroughly.
Water-based paint dries quickly so start on your smallest walls first; your speed will improve with experience.
Have a bucket or bowl of clean water and some rags close at hand for cleaning purposes.
COLOURWASH PROCESS.
In this technique the topcoat, or glaze, is patterned by gently smoothing out the glaze over the surface to give a mottled pattern.
Where the brush or mitt makes contact the glaze is lifted revealing the base coat.
It is advisable to get someone else to paint the wall with the mixed glaze ahead of you, so that you can concentrate on creating the effect.
If you must work alone, paint small sections, 6ft (2 metre) at a time, & stop the colourwash process 6 inches (150mm) short of the leading edge.
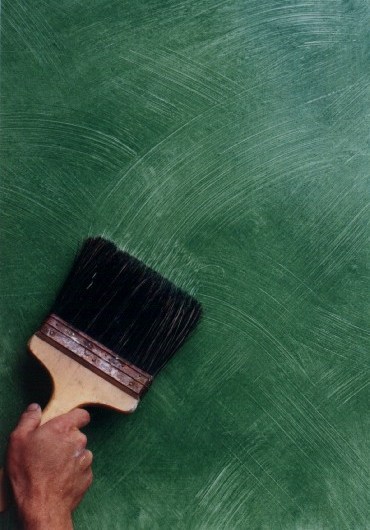
Apply the mixed glaze randomly with a brush leaving random yet even spaces in-between.
Moisten your large flat brush or car-cleaning mitt with a little of the glaze.
Applying gentle pressure use short, random strokes to spread out the glaze to create a 'mottled' irregular pattern.
Some people use a semi-circular motion for this effect, others, a criss-cross motion. There is no correct method, so try both or create your own.
Occasionally wipe the brush or mitt on a piece of cloth to prevent the build up of glaze.
Brush over previous brush marks, again pulling the glaze in a random direction. This will help maintain a subtle finished effect.
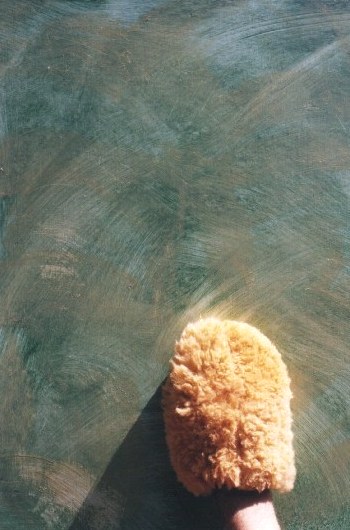
Repeat the process over the whole wall, lapping-in on wet edges.
The challenge of colourwashing is to move the brush or mitt evenly over the surface.
Everyone's technique is individual, so only one person should create the effect.
Allow the first wall to dry before starting another to prevent spoiling the finished effect.
You may wish to repeat the colourwash process with a second colour once the first is dry.
In this instance, it is advisable to switch from using a brush to a mitt or vice versa.
Allow the paint to dry before protecting with a coat of clear glaze or varnish (optional).
Method 1
Method 2
Method 3

!!! With oil-based
method, used mitts should be washed in soapy water before disposal to prevent spontaneous combustion. !!!
The more contrast between the basecoat and topcoat; the more pronounced the pattern will be.
You should not add white to the basecoat colour to make the topcoat, or vice versa. This gives poor results unless the contrast is strong.
An oil-based basecoat will greatly improve the working time of the glaze. It is advisable to use an oil-based topcoat too in this instance.
A silk or semi-sheen basecoat works best as it provides less suction than a matt finish thereby allowing the brush or mitt to glide freely.
Colours should be related in some way, either different tones of the same colour, or similar tones of related colours.
Start from the edge of a wall and work away from it, rather than starting in the middle of a wall which would give you two wet edges.
![]()
![]()