- Dust sheets or similar material to protect carpets furniture etc.
- Disposable plastic gloves (optional).
- A bucket or bowl of clean water plus rags for cleaning.
- A tin of paint thinned with transparent glaze according to manufacturers instructions.
- A roller and tray and/or a brush.
- A long-bristled brush.
Dragging is a basic form of wood graining. It is particularly attractive when used to frame panels of other paint-effects.
With large areas, it may be easier & faster to use a worn paperhangers brush or a large wall brush, following the techniques described here.
Like all paint-effects, dragging can be a little messy, so wear old clothing or overalls.
Also: remove or cover all carpets, furniture and other valuables from the room.
Prepare
the surface that is to be painted, apply at least 2 coats of mid-sheen paint in your chosen
colour
and allow to dry thoroughly.
Water-based paint dries quickly so start on your smallest walls first; your speed will improve with experience.
Have a bucket or bowl of clean water and some rags close at hand for cleaning purposes.
DRAGGING PROCESS.
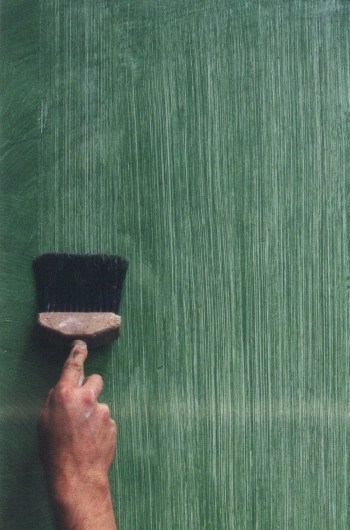
In this technique the topcoat, or glaze, is patterned by dragging a long-bristled brush down the surface of the wall.
Where the brush makes contact, the glaze is lifted revealing the base coat.
It is advisable to get someone else to paint the wall with the mixed glaze ahead of you, so that you can concentrate on creating the effect.
If you must work alone, paint small sections, 3ft (1 metre) wide & stop the dragging process 6 inches (150mm) short of the leading edge.
Then paint the next 3ft (1 metres) strip, and continue the effect.
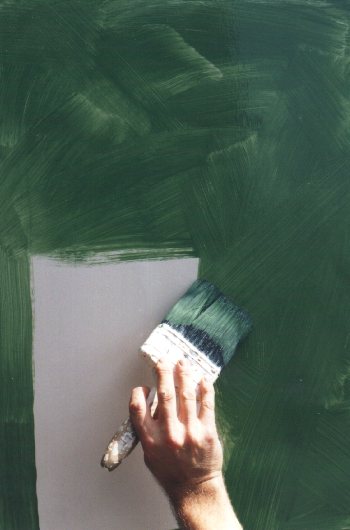
Apply the mixed glaze evenly with a brush or roller.
Brush a small amount of glaze onto the dragging brush.
Hold the dragging brush, with the bristles pointing upwards at a very shallow angle against the surface.
Start at the top of your wall, and simply drag the brush down to the bottom (in one single, straight stroke if possible).
Repeat the process over the surface, keeping the brush strokes parallel.
If you have difficulty keeping the lines parallel, overlap the previous lines just a little, and concentrate on following these lines.
You will probably find that the glaze has been wiped out too much at the top & that you were unable to wipe out any glaze from the bottom.
This is a common problem and is often a telltale sign that an amateur has created the effect. Here's how to correct it: -
Bottom edge - You probably couldn't wipe the glaze from the bottom edge because the skirting board pushed the bristles away from the wall.
Simply start again from the bottom edge, drag the brush up the wall but this time gradually lift the bush away from the wall as you go.
This should fade the new brush-strokes into the old.
Repeat this along the bottom edge of the wall but make sure that each stroke is of a different length to avoid creating a band-like effect.
If this takes out too much glaze try the top edge technique as below.
Top edge - Dab some more glaze along the top edge (don't be concerned about spoiling other paintwork, it can be cleaned or re-painted later).
Put the tips of the bristles as close as possible to the ceiling and move your brush up and down the first 2 inches (50mm) a few times.
Then drag the brush down again, but this time, gradually lift the bush from the wall as you go.
This should fade the new brush-strokes into the old.
This takes a little practise, but it makes a world of difference.
Repeat the process over the area to be decorated, lapping-in on wet edges.
Occasionally wipe the brush on a piece of cloth to prevent a build up of glaze on the bristles. This will help to maintain a uniform finish.
Allow the first wall to dry before starting another to prevent spoiling the finished effect.
Allow the paint to dry before protecting with a coat of clear glaze or varnish (optional).
Apply glaze.
Drag the glaze.
!!! With oil-based
method, used rags should be laid flat to dry before disposal to prevent spontaneous combustion. !!!
The more contrast between the basecoat and topcoat; the more pronounced the pattern will be. (Especially important with this effect)
You should not add white to the basecoat colour to make the topcoat, or vice versa. This gives poor results unless the contrast is strong.
An oil-based basecoat will greatly improve the working time of the glaze. It is advisable to use an oil-based topcoat too in this instance.
Dragging is a basic technique used for wood graining. Use a brown glaze colour over a cream basecoat as a simple timber effect.
There is a brush especially designed for this effect called a 'dragger' (naturally). It is available from most decorators' merchants & DIY stores.
![]()
![]()