Green Onyx.
|
Marbling is time consuming and practise is essential. It is advisable to try it out on a few sample boards first. You will then be able to see what you can achieve & get a little practise. You must first choose between marbling with oil-based or water-based (acrylic) paints. Acrylics dry much faster than oils, so you can move on to the next stage quickly. However, many of the more subtle effects can only be achieved using oils. Also: For your first attempts, it may be advisable to use oils, thereby allowing yourself more time to create the effect. |
|
Oil based technique for emulating Green Onyx Marble. |
| YOU WILL NEED: | Sample boards. |
|
Dust sheets or similar material to protect carpets furniture etc. Disposable plastic gloves (optional). Fine Sandpaper. Dust brush. Oil-based eggshell (mid-sheen) paint pale mint colour. Turpentine or white spirits. Raw linseed oil. Liquid driers. Tubes of oil colour: Ivory Black, Prussian Blue, Raw Umber & Indian Red. White undercoat. Brushes: 1" (25mm) paintbrush & size 3 sable pencil brush. Stippling brush. Badger softener. Hog-hair softener. Clear varnish. |
| Step 1: | Prepare your sample boards: |
|
Hardboard (available from timber merchants & DIY stores) is perfect for use as sample boards. Cut the hardboard (they may do this for you) into sections 2' (600mm) high by 1' (300mm) wide. Sand down the face & edges of the board with fine sandpaper, then dust off with your dust brush. Paint the sample boards with 2 coats of pale mint oil-based eggshell & allow to dry thoroughly. |
|
| Step 2: | Mix your medium in the following quantities: |
|
Mix 1 eggcup full of boiled linseed oil with 2 eggcups full of Turpentine. Then add liquid driers, approx 5% - 10% depending on atmospheric conditions (i.e. less driers in warm, dry atmosphere). This is your "medium" or "glaze", which will be mixed 50-50 with the colours. |
|
| Step 3: | Create the background. |
|
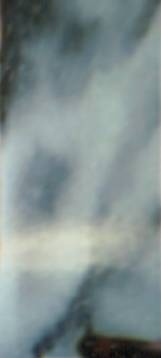
Mix Ivory Black (90%) with Prussian Blue (10%) then mix this colour 50-50 with the glaze. You only need a small amount. Baking trays are ideal for mixing the colours with the medium. Paint onto the panel in drifts, then stipple onto the bare patches to make a gradual colour change ( see figure 1 ). In the darkest parts, remove some colour by ragging-off with a dry lint-free rag to add depth. Gently soften the whole panel with a hog-hair softener. |
|
| Step 4: | Adding background veins. |
|
Mix Raw Umber (50%) with Indian Red (50%) then mix this colour 50-50 with the glaze. Add a few thin patches with the mix, stipple out & soften (as before). Using a size 3 sable pencil brush, paint on some veins with this mix and then gently soften across the veins. Your panel should now look like figure 2. Allow the panel to dry thoroughly before the next step. |
|
|
|
|
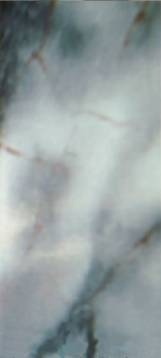
| Step 5: | 1st Overglazing. |
|
Smear some clear glaze thinly over the panel (this will prolong the open time). Mix white undercoat with the clear glaze 50-50. Paint the mix on in scattered patches, leaving some areas blank (see figure 3), stipple out & soften (as before). Paint over parts of the red veins to give depth, lightly stipple and soften these patches. Add white streaks with a feather or a sable pencil brush (rolled). Add white veins over red veins if they are too strong. Add two or three new white veins and then soften across. Your panel should now look something like figure 4. Use the Raw Umber and Indian Red mix, in patches to highlight old veins. Pick up some white on the tips of the hog-hair softener, and then stipple onto some parts of the veins to add depth. Add quite a few white veins in one corner and soften across, but in one direction only. Allow the panel to dry thoroughly before the next step. |

|
|

|
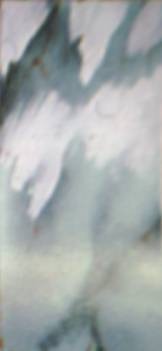
| Step 6: | 2nd Overglazing. |
|
Smear some clear glaze thinly over the panel (as in step 5). Mix the original mint-green colour 50-50 with the clear glaze & spread it thinly all over the panel. Wipe out patches with a clean lint-free rag, and then stipple. Add white patches at random, and then stipple again. Then paint broad scattered veins in white, in one general direction. Dab out a few patches with a rag & soften across the veins, but in one direction only. Create a few mottles by wiping off some colour with an eraser or something similar. Rub out odd parts of veins to add depth, then lightly stipple and soften. Using a clean sable pencil, add broken veins using just the clear glaze. The veins will be almost invisible until you soften across the veins, in one direction only. Allow the panel (which should now look like figure 6) to dry thoroughly before moving on to the next step. |
|
| Step 7: | Protecting your work. |
|
Apply at least two coats of clear varnish to protect the work. If the overall colour is too light, a little of the mint-green colour can be added to the varnish. We would appreciate your feedback on this tutorial to help others in the future. |